Friday, February 15, 2013
Are YOU an "Old Soul"???
As you could probably already tell from my blog title, I have often been called an "old soul". Well, I recently found a fantastic article, written by Nathan Savin Scott, which points out ways to tell if you, in fact, are an old soul. I smiled.......hope you will too!
Keep your Valentine's flowers around longer!
Hello everyone! I'm back from my stent away from the computer (gasp!) and have several posts swimming around in my head that I can't wait to share with you all.
First, I hope you all had a wonderful Valentine's Day - whether celebrating with your special someone, with a group of friends, or simply curled up with a glass of wine watching a sappy rom-com.
 My husband, John, was very sweet for Valentine's Day. John knows that I'm not a big fan of traditional red roses, so he brought me a bouquet of Carnations, Peruvian Lilies, Pompons, and Daisies. And chocolates....... mmmmm......chocolates.........
but I digress.
Back to the point - I heard many moons ago that if you put a penny in the vase along with your fresh flowers, it will help them stay fresh for longer. Over the years, I've tried to remember to always drop Mr. Lincoln in with my floral arrangements, but I never really noticed a difference in the freshness of my flowers. That is why I decided to buck the system.........to break tradition.........to challenge the jewel of knowledge that had been bestowed upon me.................I decided to Google it.
Quite interesting, actually. Along with dropping a penny into the water, there are also several other suggested ways to keep flowers fresh, ranging from dropping in an aspirin tablet (your roses won't keel over from a stroke) to mixing wine into the water (seriously - why waste good wine???). I did, however, stumble upon two different sources, each written by knowledgeable sources (a chemist & a horticulturist) that debunk the aforementioned treatments and gave some seemingly down-to-earth, logical ways at prolonging the life of your flowers.
To see each article in its entirety, simply click on the author's name.
Mary H. Meyer, Extension Horticulturist at the University of Minnesota, advises that you trim the stems of your fresh flowers underwater before putting them into a vase of water. This ensures no air can get into the stem and wilt the flowers prematurely. She also suggests keeping flowers away from fruit, since the gas emissions from ripening fruits can actually speed up the wilting process of the flowers. Ms. Meyer stressed the importance of using a floral preservative (many bouquets come with a small sealed pouch of this) in a clean vase.
Anne Marie Helmenstine, Ph.D., is a freelance writer and scientific consultant with an extensive background in Chemistry and Biology. She expounded on cutting stems, adding that you should cut them at an angle to give a wider surface area for the flowers to take in water, and keeping them from sitting flat against the bottom of the vase. She suggests keeping the flowers trimmed from excess foleage since the decomposing leaves can seep bacteria into your water and rot your flowers quicker. She, too, is a fan of using plant preservatives. Here are some recipes for do-it-yourself flower preservative (in case you want to bring your own garden flowers indoors!)
Cut Flower Preservative Recipe #1
First, I hope you all had a wonderful Valentine's Day - whether celebrating with your special someone, with a group of friends, or simply curled up with a glass of wine watching a sappy rom-com.

but I digress.
Back to the point - I heard many moons ago that if you put a penny in the vase along with your fresh flowers, it will help them stay fresh for longer. Over the years, I've tried to remember to always drop Mr. Lincoln in with my floral arrangements, but I never really noticed a difference in the freshness of my flowers. That is why I decided to buck the system.........to break tradition.........to challenge the jewel of knowledge that had been bestowed upon me.................I decided to Google it.
Quite interesting, actually. Along with dropping a penny into the water, there are also several other suggested ways to keep flowers fresh, ranging from dropping in an aspirin tablet (your roses won't keel over from a stroke) to mixing wine into the water (seriously - why waste good wine???). I did, however, stumble upon two different sources, each written by knowledgeable sources (a chemist & a horticulturist) that debunk the aforementioned treatments and gave some seemingly down-to-earth, logical ways at prolonging the life of your flowers.
To see each article in its entirety, simply click on the author's name.
Mary H. Meyer, Extension Horticulturist at the University of Minnesota, advises that you trim the stems of your fresh flowers underwater before putting them into a vase of water. This ensures no air can get into the stem and wilt the flowers prematurely. She also suggests keeping flowers away from fruit, since the gas emissions from ripening fruits can actually speed up the wilting process of the flowers. Ms. Meyer stressed the importance of using a floral preservative (many bouquets come with a small sealed pouch of this) in a clean vase.
Anne Marie Helmenstine, Ph.D., is a freelance writer and scientific consultant with an extensive background in Chemistry and Biology. She expounded on cutting stems, adding that you should cut them at an angle to give a wider surface area for the flowers to take in water, and keeping them from sitting flat against the bottom of the vase. She suggests keeping the flowers trimmed from excess foleage since the decomposing leaves can seep bacteria into your water and rot your flowers quicker. She, too, is a fan of using plant preservatives. Here are some recipes for do-it-yourself flower preservative (in case you want to bring your own garden flowers indoors!)
Cut Flower Preservative Recipe #1
- 2 cups lemon-lime carbonated beverage (e.g., Sprite™ or 7-Up™)
- 1/2 teaspoon household chlorine bleach
- 2 cups warm water
- 2 tablespoons fresh lemon juice
- 1 tablespoon sugar
- 1/2 teaspoon household chlorine bleach
- 1 quart warm water
- 2 tablespoons white vinegar
- 2 tablespoons sugar
- 1/2 teaspoon household chlorine bleach
- 1 quart warm water
Tuesday, February 5, 2013
Seed stratification - not as hard as it sounds

I began to contemplate if I made the correct decision with my choice of herbs. I finally decided not to let a silly five-syllable word frighten me. I would figure out how to stratify seeds, or die trying!.......at least, my plants would die while I was trying.......but you get the idea.
I did some research (God bless Google!) and discovered that stratification is a process some plants must go through to break out of hibernation, a.k.a. dormancy. Some of you may already know that certain flowers must be planted in the fall in order to bloom in the spring / summer. By doing this, you are stratifying the plants. When plants / bulbs / seeds are planted in the fall, they are like Sleeping Beauty. Alive, but just laying there, unable to do anything. Think of the winter time as Prince Charming's kiss.....in a weird, unromantic depressing sort of way. The period of cold, wet, and sometimes freezing climate magically wakes the seeds / bulbs from sleep so they can thrive in the spring.
Now, if you are like me, you didn't plant your seeds in the fall because.......well.......you didn't have a garden to plant them in. But you do now, and you are ready to plant until you heart is content! Just one problem: you are now staring down two (or more) packets of seeds with instructions containing the word "stratification."
Well fret not, because as I found out, it's not as hard as you might think. Follow me on my magical botany journey as I stratify my seeds for the first time ever!

For the soil, I purchased a 6 quart-sized bag of "starter soil" at Dollar General for $3.00. It has sphagnum peat moss, professional grade vermiculite, and perlite, and is lightweight but absorbs water easily.

Make sure you don't pack the soil to hard, because once stratification is over, you will use the same soil to germinate your plants. If the soil is too dense, it could affect the root growth of the seed. Next, using the end of a marker, a chopstick, or whatever small cylindrical object you have available (I used the non-inked end of a Sharpie), made a shallow indention into each little pod, and drop in a seed.

Gently cover each seed with a little of the displaced soil and very lightly tamp. You can now close your lid, label and date, and place your stratifying little babies into the refrigerator.

As a personal note, I also wrote the length of stratification for each particular seed on the outside of the container. I can barely remember what I had for breakfast, let alone remember something I did 8 - 12 weeks ago!
Now, all that's left to do is hurry up and wait. I will post in update in a couple of months to share if my first stratification process was a success.
Monday, February 4, 2013
I wanted to take the time to share a wonderful blog article with all of you. It really puts body image and values into perspective. A very sweet take from an award-winning photographer. Check out My Friend Teresa.
Sunday, February 3, 2013
Household Cleaning Recipes
Received a few recipes today that I'd like to share with you all.
The first comes from my cousin Amy H. She makes homemade toothpaste for her family, and sent me the recipe for it. She says it stores well in up-cycled hand cream jars, or even empty baby food jars (sans baby food, of course!) The recipe is simple enough, and sounds pretty good! If you try this recipe before me, let me know how you like it!
The second recipe was sent to me by my cousin Sarah G., courtesy of Budget101.com. It seems like a low-cost alternative to expensive dishwasher tablets. Plus, it doesn't call for hard-to-get ingredients. Below is the materials you'll need. Click on the Budget101 link above for the full step-by-step instructions. I, for one, am excited to give these a try!
3 - 16 cube plastic ice cube trays 1 - 54-55 oz box of washing soda / detergent booster
1 - 76 oz box of borax
1 - 2 lb carton of epsom salts
1- bottle reconstituted lemon juice
Do you have any handy cleaning recipes, tips, or tricks? If so, please share a comment below!
The first comes from my cousin Amy H. She makes homemade toothpaste for her family, and sent me the recipe for it. She says it stores well in up-cycled hand cream jars, or even empty baby food jars (sans baby food, of course!) The recipe is simple enough, and sounds pretty good! If you try this recipe before me, let me know how you like it!
Homemade Toothpaste Recipe
2 tablespoons virgin coconut oil
3 tablespoons baking soda
5-8 drops of peppermint oil
a pinch of stevia powder OR
5-6 drops of stevia liquid2 tablespoons virgin coconut oil
3 tablespoons baking soda
5-8 drops of peppermint oil
a pinch of stevia powder OR
The second recipe was sent to me by my cousin Sarah G., courtesy of Budget101.com. It seems like a low-cost alternative to expensive dishwasher tablets. Plus, it doesn't call for hard-to-get ingredients. Below is the materials you'll need. Click on the Budget101 link above for the full step-by-step instructions. I, for one, am excited to give these a try!
3 - 16 cube plastic ice cube trays 1 - 54-55 oz box of washing soda / detergent booster
1 - 76 oz box of borax
1 - 2 lb carton of epsom salts
1- bottle reconstituted lemon juice
Do you have any handy cleaning recipes, tips, or tricks? If so, please share a comment below!
Stockpiling vs. Hoarding
I got to thinking recently about of my favorite reality-TV shows: Hoarders and Extreme Couponing. Both groups of people on these two very different shows do, however, have some common ground. They both tend to attain / acquire enormous quantities of "stuff", often occupying and filling one or more rooms of their home. Most of the people on both shows discuss the euphoric "high" they feel when making purchases. A lot of them also talk about how their "collections" or "stockpiles" bring them joy and/or comfort.
It seems to me that many viewers of these shows must see a blurred line between the two groups of people on display. I first began to consider this when I noticed many of the shoppers on Extreme Couponing made statements to the effect that they ARE NOT HOARDERS. Of course, many of those people who appear on Hoarders claim they ARE NOT hoarders either.
I've raised an eyebrow on more than one occasion while watching Extreme Couponing. Some of the stockpiles seem absolutely ridiculous to me. One episode had a single young man who lived alone. He had an entire wall full of feminine products. The phrase that caught my attention was "These have wings. I don't know what wings are, but they were free!" I'm not a fan of getting and keeping large quantities of items JUST because they were free. If you can use or donate them, that's great, but I'm not going to store two pallets of free cat treats in my spare bedroom when I don't even own a cat!
I'm not against stockpiling household supplies. I myself have amassed quite an extensive stockpile of different items we use. But there is the key word.....USE. I don't buy things we have no use for. I wanted to share some of my stockpile items with you all to illustrate that not all coupons, savvy savers, and stockpilers have a garage stacked full of potato chips, dish soap and tampons.
Here's a list of some of the essentials I currently have stockpiled:


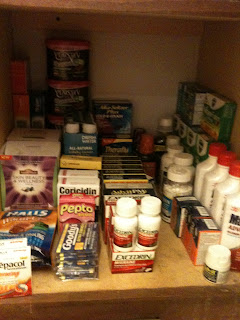 56 - rolls of toilet paper
4 - bottles laundry softener


So......I've shown you mine. Can you show me yours?
It seems to me that many viewers of these shows must see a blurred line between the two groups of people on display. I first began to consider this when I noticed many of the shoppers on Extreme Couponing made statements to the effect that they ARE NOT HOARDERS. Of course, many of those people who appear on Hoarders claim they ARE NOT hoarders either.
I've raised an eyebrow on more than one occasion while watching Extreme Couponing. Some of the stockpiles seem absolutely ridiculous to me. One episode had a single young man who lived alone. He had an entire wall full of feminine products. The phrase that caught my attention was "These have wings. I don't know what wings are, but they were free!" I'm not a fan of getting and keeping large quantities of items JUST because they were free. If you can use or donate them, that's great, but I'm not going to store two pallets of free cat treats in my spare bedroom when I don't even own a cat!
I'm not against stockpiling household supplies. I myself have amassed quite an extensive stockpile of different items we use. But there is the key word.....USE. I don't buy things we have no use for. I wanted to share some of my stockpile items with you all to illustrate that not all coupons, savvy savers, and stockpilers have a garage stacked full of potato chips, dish soap and tampons.
Here's a list of some of the essentials I currently have stockpiled:


59 - bottles / bars of body wash
32 - bottles of shampoo & conditioner
 56 - rolls of toilet paper
30 - skincare products
30 - razor cartridges
22 - boxes feminine products
20 - pain relievers
19 - boxes facial tissues
18 - rolls paper towels
16 - boxes / bottles cold & flu products
13 - packages antacid
13 - shaving creams
12 - toothpaste
9 - boxes of sleep aids
9 - tubes of lip balm
5 - bags cough drops
5 - boxes band-aids
5 - boxes dryer sheets
5 - bottles dish detergent


So......I've shown you mine. Can you show me yours?
Thursday, January 31, 2013
Quick Weekday Dinner Idea
Tonight was one of those evenings I really didn't want to spend a lot of time on dinner, but I also wanted something tasty. So, I made a super-quick, delicious, inexpensive meal and wanted to share it with you all.

**Please note, I made this dinner for two people. You may need to adjust quantities according to the number of plates you are making. Also, the product is what is key - not the brand. If you have the same product under a different name, it will work the same.**
Ingredients you will need:
- (2) boneless pork chops
- (1) Idahoan potato pouch
- (8) spears frozen broccoli
- (1) Bisquick Complete buttermilk biscuit pouch
- (1) Kraft Parmesan Cheese Seasoning Blends packet
- (4) tablespoons butter
- 1/3 cup white wine
- 2 1/2 cups milk
- 1/2 cup water
- 3-4 tablespoons canola oil
- 2 tablespoons flour
- Salt & pepper, to taste

Equipment you will need:

- Frying / saute skillet
- Medium sized pot with lid
- Measuring cups & mixing bowl
- Small cookie sheet
- Plastic storage bag
- Parchment paper & paper towels
- Strainer, tongs, mixing utensils
 Begin by getting your ingredients and equipment together. If using frozen pork chops, remove them from the freezer and defrost them. I prefer to thaw them in the microwave, using a one minute cook cycle. If you do this, watch the meat carefully, as too a lengthy cycle will not only thaw, but also cook the pork.
  As you will notice, I bag my pork chops individually. I found it makes for super easy portioning (no more thawing out more meat than you need!), plus it keeps my hands from touching raw protein (GERMS!!). They now make special portion freezer bags, but I simply use fold-over sandwich bags and then put all the individual portions into a large freezer bag to protect from freezer burn.
 While the pork is thawing, preheat your oven to 450 degrees and line your cookie sheet with parchment paper. If the paper is too large, simply fold it underneath itself to size. Set aside to use later.

Next, fill a medium pot half-full of water. Add approximately half a teaspoon of salt and one tablespoon of butter into the water. Cover pot with lid and turn the burner on medium heat.

Empty the contents of the Parmesan cheese packet into a plastic food storage bag. Place the thawed pork chops into the bag, seal, and shake until the chops are well coated. Set the chops (still in the bag) aside until ready to cook.
Next, combine 1 3/4 cups milk and the contents of the potato pouch in a large measuring cup. Mix well, making sure to stir from the bottom up to insure all the potato goodness is incorporated. The spuds will still have a soupy consistency once mixed, but this will change once it is heated.
 **I should mention that the directions on the potato pouch state to use 2 cups of water. However, I find that using 1 3/4 cups of milk INSTEAD yields a richer, creamy potato. You can choose whichever method you prefer.**
 Set the mixing cup of potatoes in the microwave. You will heat them when the pork is almost finished cooking.
 In a small mixing bowl, combine the Bisquick biscuit mix and 1/2 cup of water. Mix thoroughly. This mixture will be lumpy even after well-mixed due to the chunks of butter in the dough.

 Drop large spoonfuls of dough onto the cookie sheet, about two inches apart. Place biscuits in the oven for 8 - 11 minutes, until golden. Remove from oven and set aside to cool.
 Once you have placed the biscuits into the oven, pour approximately 3-4 tablespoons of oil into a frying pan and heat on medium heat.
**I used canola oil, but you can use any oil with a higher smoke-point. Oils such as olive oil are not recommended in frying.**
 Once the oil has heated for a couple minutes, turn the heat down to medium-low. Remove the pork chops from the storage bag with tongs and gently place them into the skillet. The cooking time of the pork will vary according to their thickness (I cooked mine for 5 minutes per side) but you want to make sure they reach an internal temperature of 170 degrees.
 Do NOT eat undercooked pork, as it can result in the parasitic disease Trichinosis. Correctly cooked pork will be a creamy white color. If it is pink, it is undercooked. If in doubt, use a meat thermometer or cook it a little longer.
An important thing to know, which I found out the hard way, is the seasoning blend will cause the oil to splatter some. The cheese has moisture in it, and when the moisture hits the oil, it pops. It subsides quickly, but can certainly surprise you if you're not expecting it.

Once you place the pork chops into the skillet, remove the lid from the pot of water. Add the broccoli spears and stir gently.

Watch the pork to ensure it doesn't burn. Once the bottom of the chops are a golden brown, gently turn them over brown the other side.
Once you have turned the pork chops, heat the mashed potatoes you mixed up earlier. Set the microwave for three minutes (adjust as necessary for your microwave's power) and press start.
Check the pork chops (either by color or temperature). Once done, remove them from the skillet and place on 3-4 layers of paper towels to drain and rest.
*Make sure to check your broccoli periodically. It takes very little time to cook, so it can quickly turn mushy if heated too long.*

 Slowly pour about 1/3 cup of white wine (drinking wine, not cooking wine as it has a high sodium content) and stir.
 It will steam and "sizzle" furiously for a few seconds as it mixes with the oils. This is called deglazing and doing this will loosen all those yummy bits so you can make a delicious gravy with them. Add one tablespoon of butter to the skillet and stir until melted and well incorporated. Next, sprinkle two tablespoons of all purpose flour over the mixture.

Using a whisk, cook until golden in color and it takes on a thick, smooth texture. Because of the browned bits, it may be difficult to detect a difference in color. Just make sure you cook the mixture for about a minute - if you don't cook it long enough, your gravy will taste like flour.

Slowly pour in 3/4 cups of milk, whisking the mixture quickly to blend. The mixture will become thicker the longer you cook it. If it is too thick, add more milk. If it is too thin, add more flour.

Once the broccoli is tender to your liking, drain the water off and sprinkle lightly with salt.
Now for the really fun part................fix your plate and ENJOY!

*For those of you who want to make a nice plate presentation, you can garnish with a LIGHT sprinkling of parsley around the edges.*
Subscribe to:
Posts (Atom)